What ECT Can Find vs. What It Cannot
In a related article, we touched on some interesting facts about the eddy current testing procedure. This time, we’ll take a closer look at some of the variables that have an effect on eddy current testing (ECT), what it can find, and what it cannot find.
Not All Defects Are Detected Equally
The types of defects in a material determine the effectiveness of the eddy current testing procedure. For instance, discontinuities and defects that are parallel to the flow of the eddy current — such as radial or point cracks — will not be detected by most eddy current testing equipment, which works best for defects that occur along the length of a part. To find a single point crack using a radial coil requires a specialized setup, with multiple probes that rotate around circumference of the part. In addition, the morphology of a crack is both a surface defect and an internal defect; this means the eddy current testing procedure needs to filter multiple readings.
Internal defects that exist solely in the interior of metal parts are more difficult or even impossible to detect, especially with thicker materials, due to the skin effect — the tendency for internal defects to produce an exponentially weaker eddy current signal than external defects. The technical term for the intensity of the signal on the depth of a thicker part is depth of penetration. At Metal Cutting Corporation, our ECT system has a depth of penetration of about 0.050” (1.27 mm) for molybdenum and tungsten.
Eddy Current Testing Procedure for Non-Radial Defects
At Metal Cutting, our focus is on draw lines and elongated grain structures. Draw lines are more common and can occur in many different types of metal materials. Draw lines can be either occlusions in the metal that got pulled through the die or defects of the die that score and damage the metal as it is being drawn. In our world of refractory metals, such as molybdenum and tungsten, the materials are formed through powder metallurgy and are sintered and then swaged and drawn; therefore, these metals are never in a molten state, and their elongated grain structures are entwined. However, there is potential at the grain boundaries for gaps that are in the longitudinal direction.
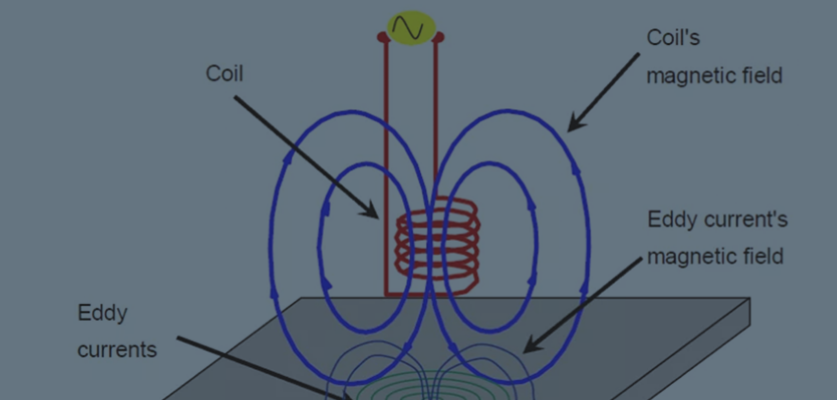
Conveniently, the eddy current testing procedure, which involves passing a long part through a round, hollow coil, is ideal for detecting these types of defects. What ECT struggles with is radial cracks, which are highly transient — appearing and disappearing quickly. The cross section where the crack is might be so small that the eddy current cannot detect it. For example, even if you have a wire with as much as a 90% radial crack, it would be tricky to detect the crack unless you have eddy current testing equipment with specialized rotating multi-coils.
Depth Perception But Not Depth Measurement
Even when an internal crack can be detected, the actual depth of the crack cannot be measured accurately using the eddy current testing procedure. The oscilloscope of the eddy current tester will show a graphic representation of a crack feature, analogous to a polar chart; as with a polar chart, you can zoom in or zoom out on the graphic representation. However, the graphic or numerical representation does not correlate to the dimensions of the crack.
Although the depth of an internal crack cannot be measured with the eddy current testing procedure, at Metal Cutting we often receive drawings specifying, for example, that a crack cannot be greater than 10% of the diameter or that the customer will not accept a defect greater than 0.001” (0.0254 mm). The challenge is, how do you operationalize those requirements? Both are difficult without having any parameters described. The percentage of diameter generally refers to depth, but “a defect no greater than” is often not defined as depth, width, or even length. While after further inquiry we almost always discover that it does not refer to length, width and depth are very important variables in the eddy current testing procedure, and finding defects as small as 0.001″ in any dimension is very challenging.
The good news is, the depth of an internal crack can be estimated by using the phase of the ECT signal and other little tricks we at Metal Cutting have learned through years of experience working with the eddy current testing procedure. Our system uses stationary probes — something we keep in mind when using reference samples to find the optimal settings for frequency, amplitude, phase, sensitivity, filtering, and other variables that are part of the recipe for the eddy current testing procedure — and we also have a two-coil setup so that we can use absolute and differential probes at the same time.
Other Factors That Influence the Eddy Current Testing Procedure
There are a number of other variables that have an impact on the eddy current testing procedure and the results it produces.
Properties of the test material
The properties of the material being tested can affect the flow of eddy currents. For instance, the eddy current testing procedure can struggle with non-pure materials that are combinations of metals with dissimilar electrical properties. The metals in an alloy generally are not a perfectly homogeneous distribution throughout the entire length of material, so it can be difficult to set a baseline for eddy currents. Additionally, even pure element metals will contain trace elements, such as non-volatile residues (NVRs) of well less than 1%, which will show up as defects. These types of material variations create noise that forces us to reduce the actual sensitivity we can utilize, regardless of the theoretical sensitivity of the eddy current testing procedure.
Material surface finish
Even though people like to think of eddy current testing as being like an x-ray, the reality is that it is not. Unlike x-rays, the entirety of the material being tested has an effect on the electrical properties of the eddy current testing procedure, and the surface finish can throw off the ECT results.
Because a rougher surface finish produces noise, it creates a need to adjust the eddy current testing equipment settings to compensate, so that surface finish noise is not mistaken for a material defect. So, for example, if we are being asked to identify defects greater than 0.001” (0.0254 mm), it becomes a major threshold problem. For example, a defect that is 10 times greater than the area surrounding it will literally stand out. But what if a defect of 0.001” is surrounded by a rough surface finish consisting of grooves that are 0.0009” (0.0229 mm) deep? Distinguishing that 0.0001” (0.00254 mm) variation will be really challenging for ECT.
Coil fill factor
To the naked eye, coil fill factor seems like a ratio between the OD of the material and the ID of the coil. However, more accurately, the fill factor is the ratio between the area of the coil and the area of the material. Determining the correct ratio between the coil and the material helps to ensure that the test sample will be able to move freely during scanning and the coil will generate the necessary eddy currents.
Position of the material in the coil
Ideally, the part to be tested will sit at the true center of the coil, but realistically it rarely can do so. Simple variations in material diameter, even within tolerance, affect the ability to place the part in the true center. Also, fixturing — both as originally designed and after wear from operation — can cause the true center to be more theoretical than actual.
Vibration
The vibration of the eddy current testing machine itself, as well as vibration of the feeding device that places the part inside the coil, causes noise that can interfere with the flow of eddy currents or create false signals that will be mistaken for defects in the test material.
The Bottom Line on ECT?
None of these variables defeat the eddy current testing procedure, but they do mean it cannot be used for dimensional measuring. While the procedure can be used to estimate dimensions, obviously that does not produce the kind of accuracy you would get doing a true metallurgical sample and studying the specimen. Still, eddy current testing is a valuable tool that is utilized effectively by Metal Cutting Corporation to inspect materials for flaws and is an important part of our QMS standards — enabling us to deliver high-quality precision metal parts that meet customer’s tight specifications.


