Where Qualitative Beats Quantitative
At Metal Cutting Corporation, where every day we produce thousands of rods, tubes, and wires cut to length, straightness is a feature that we work with frequently. That’s because when we centerless grind, we get optimal results when the parts we grind are straight.
In addition, our customers often call out straightness as an important feature of their parts, along with positioning and other geometric tolerancing characteristics.
Straightness is especially important for wires, pins, tubes, and other cylindrical parts that need to fit into a hole or mate with another part. The straightness of the material will also affect the perpendicularity of the end cut, so even when straightness itself is not called out on a drawing, if perpendicularity is, the starting material must be straight.
What Is Straightness?
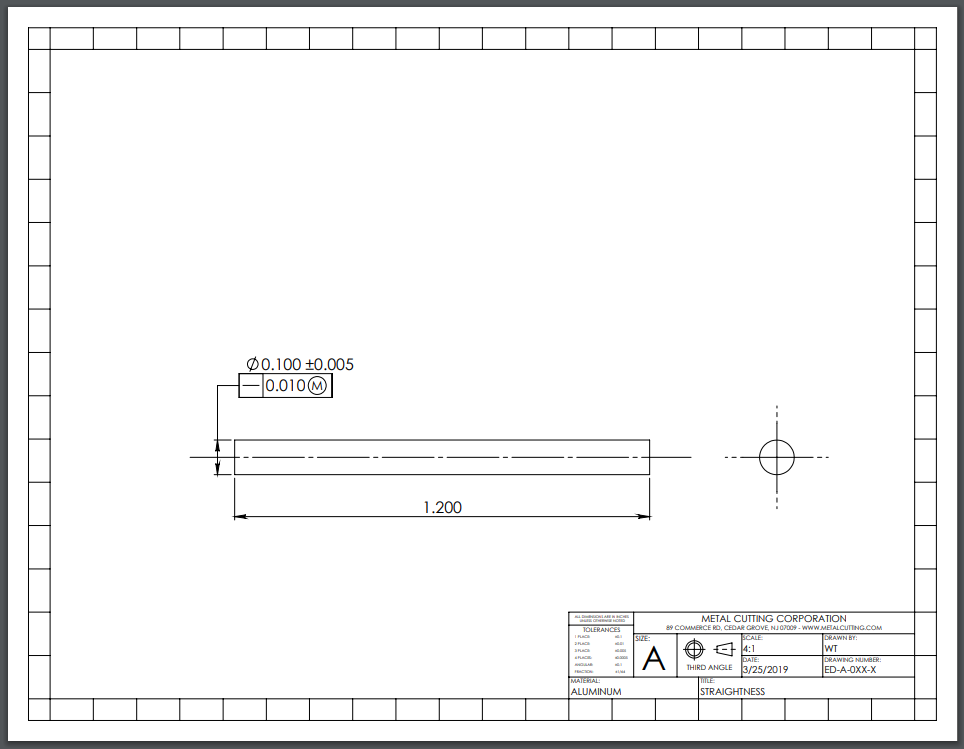
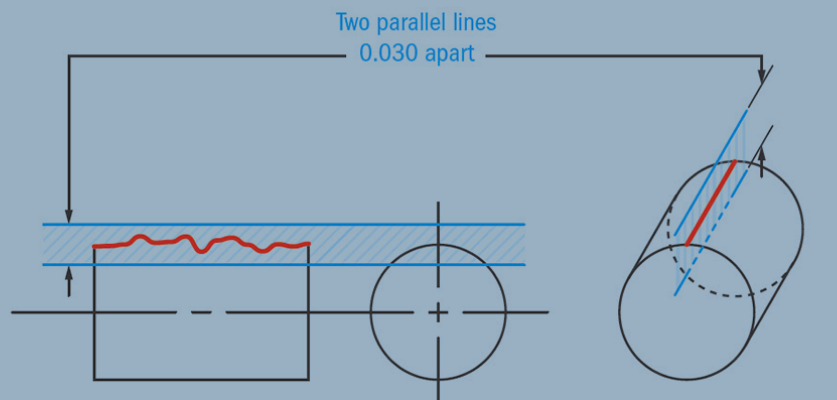
Rather than surface straightness, which is an indicator of flatness along one line on a part’s surface, the straightness we work with is an indication of how much bow (curve) is allowed in the axis of a part.
This so-called axis straightness is symbolized in GD&T by a straight line and is typically called out on an engineering drawing as being within X measurement across Y length — for example, 0.001” (0.0254 mm) over 1.0” (25.4 mm). That means over a 1” length of wire, tubing, or rod, there cannot be a bow that measures greater than 0.001” at its peak.

There are a range of ASTM standards for various materials, such as the ASTM B387-10 specification for bar, rod, and wire made of molybdenum and its alloys; it specifies the straightness requirement as 0.050” (1.27 mm) over 1’ (304.8 mm) of length.
If only things were that simple!
The Measurement Controversy
The tricky part is that the axis straightness callout is subject to a lot of interpretation.
If you had an absolutely perfect bow of X or less and found you had that same bow across every Y length section along the entirety of a part, then you could say it achieves the specified straightness X over Y times multiplied across the full length. However, many would argue that is simply not reality and therefore not an accurate measure of straightness.
In fact, the issue of determining straightness over the entire length of a part is surprisingly controversial, and the opinions on how to measure it are many and varied.
For one thing, there is no such thing as a perfect bow. When you look at the entire length of a part, there are virtually always some inconsistencies, with some areas that are slightly more bowed and others that are straighter.
In addition, the results depend on looking at any Y interval across the entire length of the part in one or two planes. If you move an inch or even a fraction of an inch to either side, you are looking at a different Y interval and so on, exponentially.
Therefore, there are an unlimited number of Y intervals to be considered. How could one possibly look at every interval or decide which ones accurately represent the whole part?
A More Straightforward Approach
Rather than debate how to measure, here at Metal Cutting we use a simple approach based on the ASTM F2819 specification. It provides four standard test methods for measuring the straightness of bar, rod, tubing, and wire to be used for medical devices.
Quantitative methods of measuring straightness
Two of the test methods are quantitative, producing a number that represents straightness measurement.
With the gap test, the part is rolled on a flat surface and the largest gap found between the flat surface and the part is measured using a pin page, a micrometer, or some type of linear scale.
With the total indicator reading (TIR) test, the material is placed between v-blocks and an indicator takes measurements as the material is rotated one revolution. The maximum and minimum readings are then used to calculate the TIR.
The problem with both of these tests is those measurements can be very difficult to perform, especially with the very small diameters we typically work with at Metal Cutting Corporation.
In addition, it can be easy to introduce errors when taking the measurements; for example, when inserting a pin gage into a tiny gap, it is easy to accidentally lift the part and alter the measurement.
Qualitative methods of measuring straightness
Because of this, here at Metal Cutting we usually opt instead for the qualitative tests that use simple pass/fail methods to determine straightness.
With the finger roll test, a part is rolled on a flat surface and if the part wobbles, it fails. If the part does not wobble, it passes and is deemed adequately straight.
As the name indicates, the inclined flat plate test involves a flat plate set on an incline to pass/fail test for straightness.
The number of degrees at which the incline is set is based on the diameter of the part (or as agreed upon by the customer and supplier), which is then placed at the top of the inclined plate and given a slight tap to set the part in motion. If it rolls down the plate quickly and easily, the part passes and is deemed straight; if the part stops, it fails the test.
Successful Time and Again
At Metal Cutting, our experience has shown us again and again that actual measurements of straightness are usually not necessary. For our purposes, we typically don’t care what the numbers are — we care that we can centerless grind a part successfully and that it qualifies as straight for its end use in the customer’s application.
Even where customers have specified X over Y straightness, our easy, definitive testing methods have never failed to meet customers’ requirements.
In the rare cases where we know there will be a bend — such as with an aggressive tumbling operation or sandblasting — or that the material we start with is bent/bowed, Metal Cutting might then use a pass/fail version of the gap test to determine if the end of the part is within the spec over the length of the part.
For achieving straightness, as well as parallelism, perpendicular ends cuts, and other important GD&T features, our goal is cost-effectiveness as well as high-quality, tight tolerance parts. To that end, we find the qualitative test methods we use for straightness and other features consistently help us keep production costs under control while delivering the results our customers need.


